Character editor
Hello creator!
 Written for v0.9.5.0 by itchyOwl
In Barotrauma, all characters have a character config file. A character config file defines visual things like sounds and particle effects as well as functional things, like how the character acts, how much health it has, and whether or not it can walk. A character config file also contains references to the ragdoll and animation files.
A ragdoll file defines the physical dimensions of the character: How many limbs and joints does it have? At what coordinates are they found on the texture? How much does the character weigh? What are the relations of the limbs to each other and how they constitute the skeleton or the physical ‘ragdoll’ of the character. A ragdoll file also contains things like damage modifiers (armor or weak spots), lights, and attacks.
The movement of the character is defined in the animation files. The animation files contain things like forces, multipliers and other variables that define the forces applied on the ragdoll when it moves. Each animation type is defined in a separate file. For a character that can move, that would mean four different files: Walk, Run, SwimSlow, and SwimFast.
In the character editor, you can edit all the character files without having to worry about .xml editing. In the following, you can find more detailed instructions for editing each of these files or aspects of the character.
TIP: Use the number keys [1] to [5] on your keyboard to quickly switch between the different edit modes.
Creating a new character
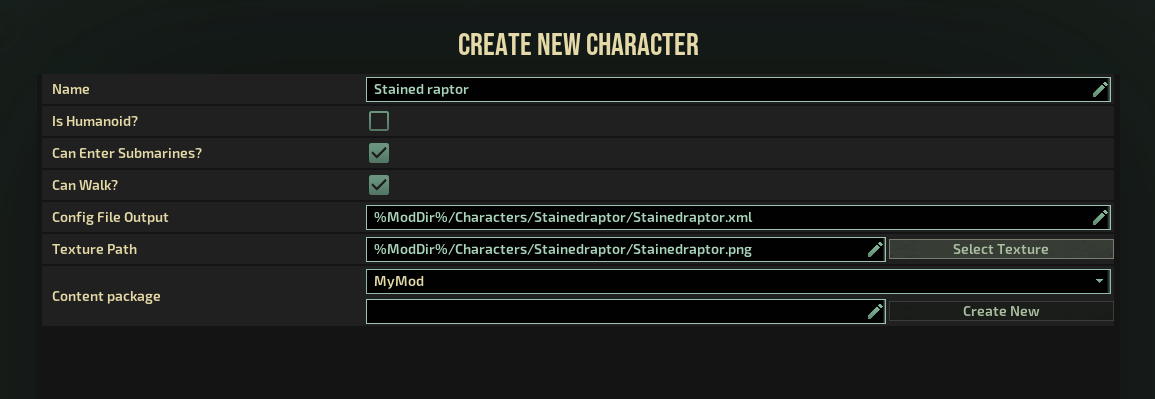
To create a new character, click the ‘Create New Character’ button found on the ‘Files’ panel. The following view will ask for basic information about the character you are about to create. The paths to the config file and the texture path are both relative to the Barotrauma project folder.
The ‘Config File Output’ is the path to the character config file. At this point, the file does not yet exist: it will be stored on disk when the character is created. You can change the path here, but the default should be fine too.
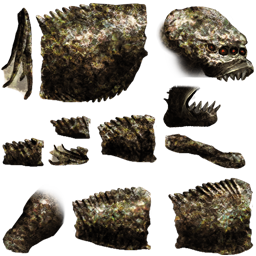
One thing you should have on hand at this point is a texture for the character. In Barotrauma, all characters are made of limbs that have a sprite. In practice, you’ll need a sprite sheet, where the sprites for all the limbs of your character are found.
You also need to select or create a new content package for the character, which contains the custom content for the game. A content package is essentially a mod. Select the content package you want to use for the character or create a new content package by providing a name for it and clicking the ‘Create New’ button.
Once you have filled out the basic information, you can define some limbs. Use the ‘+’ and ‘-’ buttons to add or remove limbs. You can also add multiple limbs by defining a 2D grid (the ‘X’ and ‘Y’ fields) and pressing the ‘Add Multiple’ button.
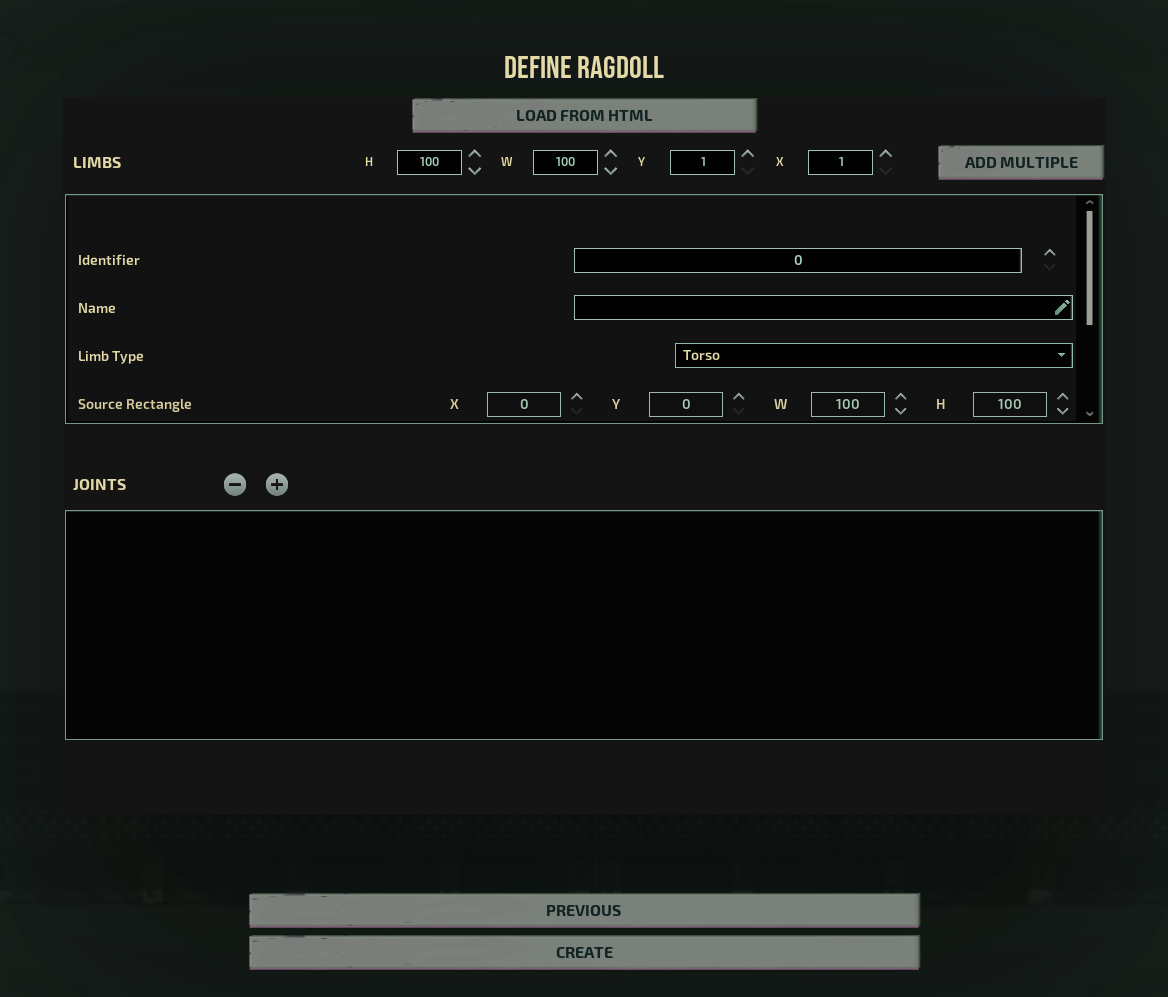
Don’t worry too much about the definitions here. We just want to add some limbs that we can edit later on. It’s also possible but currently not advised to define the joints here. It can be done later much more easily.
Limbs
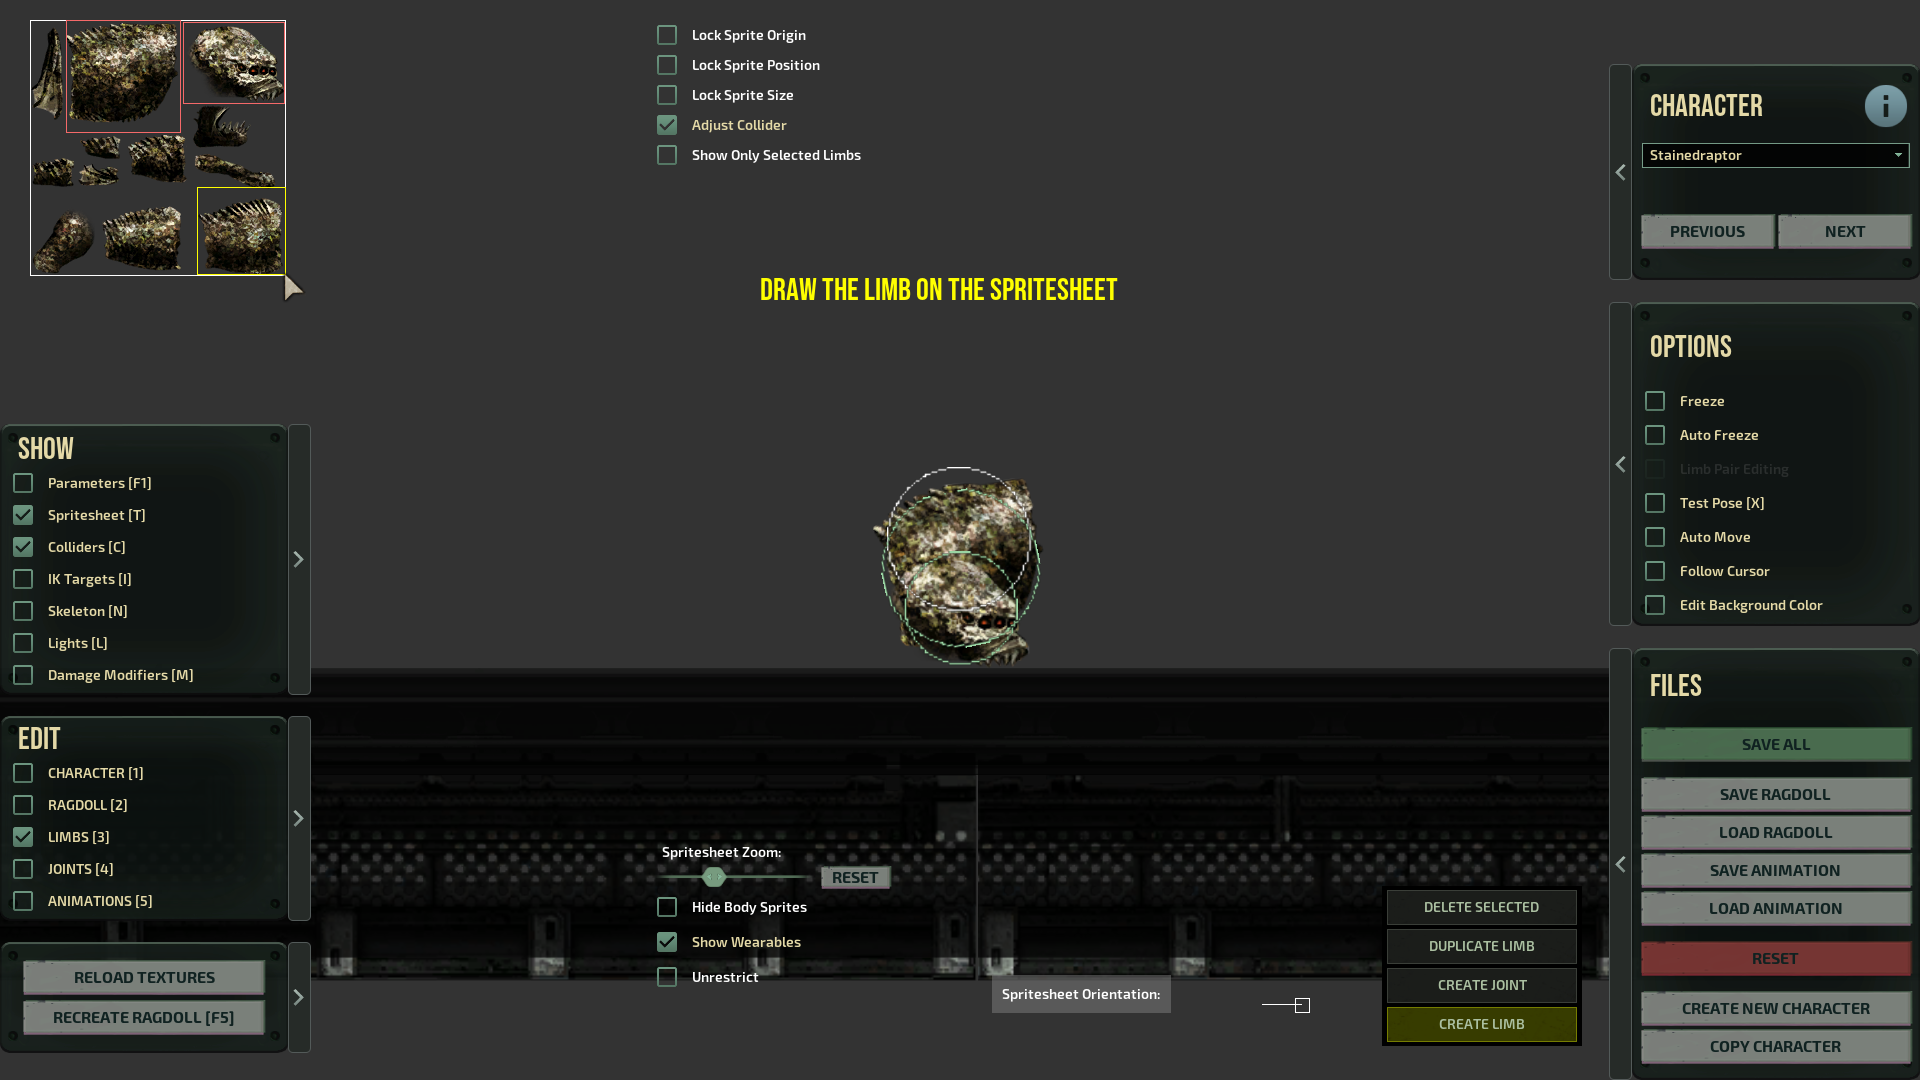
When you are done with adding some limbs, click the ‘Create’ button. At first, your character will look a terrible mess with all the limbs on top of each other. This is because there aren’t any joints yet to join and keep apart the different limbs. For now, let’s just ignore how the character looks in the game view; it won’t look right before we add the joints.
TIP: You can add limbs after creating joints and create joints before the limbs are final. However, it’s easier to define the limbs first. Then the joints. And then iterate.
Before going into how we add joints, we should first adjust the source rects and the colliders of the limbs. Source rects are simply definitions about the position and the dimensions of the limbs; they mark where the limb is on the texture file (in pixels). Colliders, on the other hand, are the physical definitions of the limbs. They determine how the limbs move in the game world. Note that if the colliders are of a wrong size, the collisions won’t work right. If the colliders are too small, the ragdoll can be unstable and even explode.
OK, let’s start editing. First, make sure that you have the ‘Spritesheet’ and ‘Limbs’ toggles selected on the ‘Edit’ panel. Also cross over the ‘Adjust Collider’ toggle found on top of the screen.
TIP: You can change the collider shape by adjusting the collider dimensions from the parameters. Enable the ‘Parameters’ toggle to see the parameters of the selected limb.
You’ll now see the colliders of the limbs drawn in green over your character. Select the limbs over the sprite sheet. Drag the small box in the top left corner to move the source rect, and the box in the bottom right corner to adjust the size of the source rect (and the collider).
IMPORTANT: When the ‘Adjust Collider’ mode is enabled, the colliders are automatically recalculated when you edit the source rects. This will overwrite your manual adjustments!
TIP: Use the arrow keys to move the source rect one pixel at a time. Hold Left Control to adjust the size of the source rect.
You can add more limbs by duplicating an existing limb or by creating a new limb. Enable the ‘Limbs’ mode in the ‘Edit’ panel. Now the buttons on the lower right should become enabled. Press ‘Create Limb’ and draw a rect over the sprite sheet where the limb should be found on the texture. Releasing the mouse button should create the limb.
TIP: Most of the limbs can also be deleted, but there are some restrictions to this. If joints or limbs don’t get deleted or added correctly, or you have some other issue in the editor, take a look inside the .xml file. You can manually add or remove limbs and joints in the .xml too.
Joints
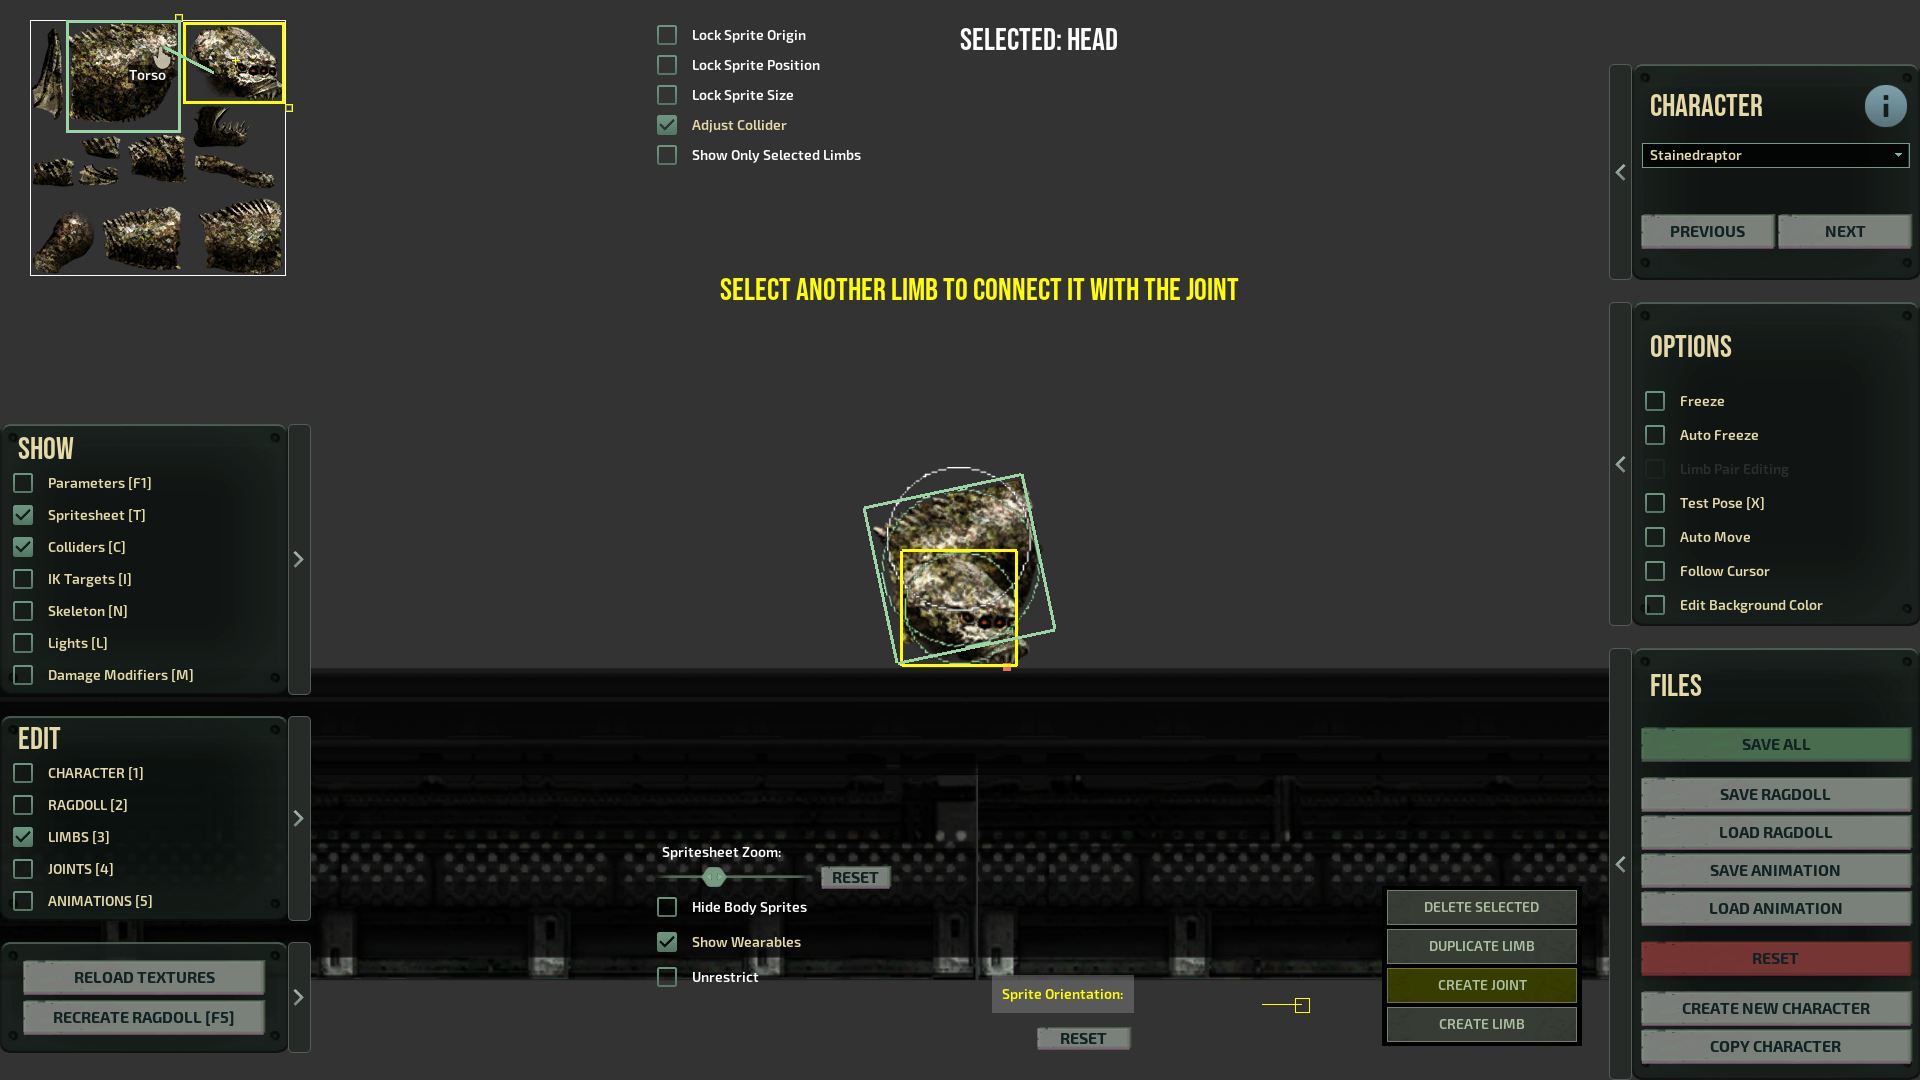
When you are done with the main limbs (you don’t have to define all of them at once), you can start creating joints between the limbs.
Make sure to have the ‘Limbs’ mode selected. Then select a limb, and click the ‘Create Joint’ button [ctrl+e]. You can now draw a joint between two limbs. First select the starting point of the joint inside the currently selected limb by clicking somewhere inside the limb’s source rect on the sprite sheet. After that, you’ll need to define the other end of the joint. To do that, hover your mouse over the limb you want and select it with the left mouse button. Note that the location matters: the other end is created at the position of the mouse. This can of course be changed after the joint has been created.
TIP: Press [ctrl] to select and edit multiple limbs or joints at the same time.
TIP: In the joint editing mode, click ‘Copy Joint Settings’ to copy the settings of the first selected joint to the other joints.
The editing mode should now automatically change to ‘Joints’. In this mode, we can see the joint ends drawn as red circles. If you select one of the circles, it will change the color and show three small widgets next to each end of the joint.
TIP: You can edit and create limbs and joints also over the character in the game view, but it’s usually easier to do it on the sprite sheet.
Try dragging the circular widget. This is the anchor point of the joint. It defines the point where the limb is attached to the other limb. The longer the distance between the two ends, the longer the joint. And the longer the joint, the farther the limbs are from each other.
TIP: If the limbs seem to be on top of each other and the joint ends look correct on the sprite sheet but wrong in the game view, try flipping the joint ends (i. e. just drag them so that they swap places).
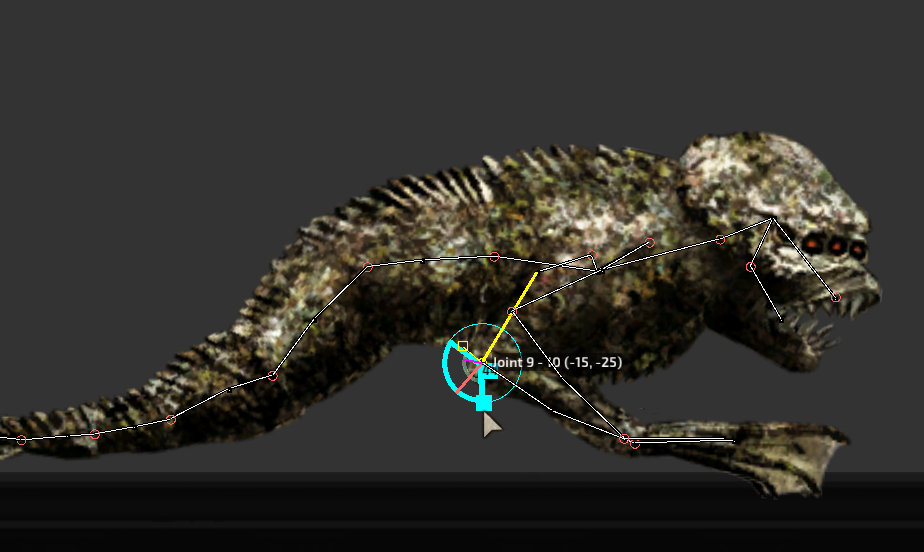
When you get both joint ends in place, select one of the rectangular widgets. These are the joint angle controls. They define the limits of joint rotation. There’s an upper limit and a lower limit. By default both are set to 0. When the joint limits are at the same value, the joint is not allowed to bend at all. The upper limit should always be higher (or the same) than the lower limit. Both limits go clockwise from -180 degrees to 180 degrees.
IMPORTANT: By default, the rotations start from the bottom (-180) and also end at the bottom (180) meaning that 0 degrees is at the middle point, i.e. pointing up. ‘Spritesheet Orientation’ is the setting that adds an offset to this. Enable ‘Spritesheet’ on the ‘Show’ panel to see the orientation controls.
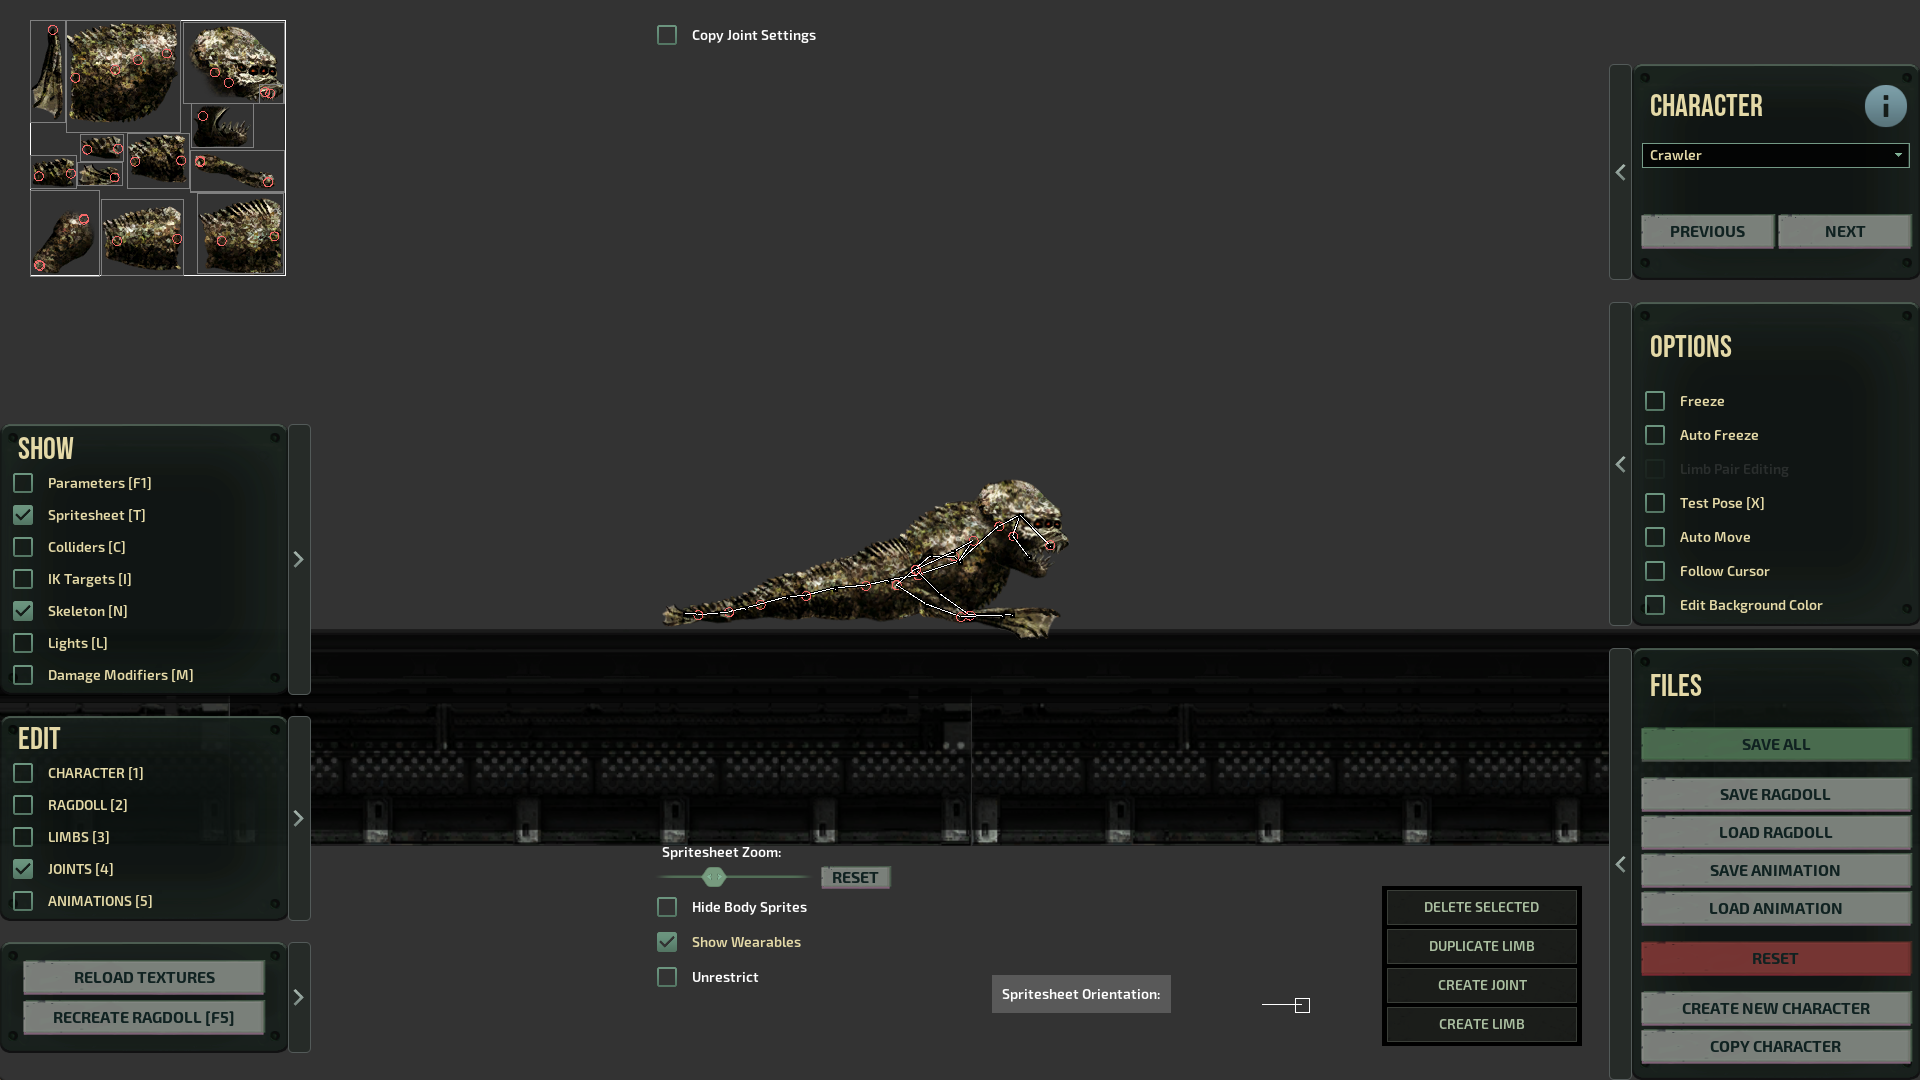
The line should point to the local forward direction of the texture sheet. For example for the vanilla human, the up is 0 and for the Crawler it’s 90 degrees (right).
If you have a limb selected, the text will be ‘Sprite Orientation’. And if you now change the orientation, the text and the controls turn yellow. This means that you have edited the offset for the selected limb only. To undo this, press the ‘Reset’ button next to the controls.
![]() Characters that have their head as the main limb, e.g. worms and fishes, might not require adjusting the orientations per limb-basis. But for the limbs that are not pointing at the same direction on the sheet, we need to define the direction separately.
Characters that have their head as the main limb, e.g. worms and fishes, might not require adjusting the orientations per limb-basis. But for the limbs that are not pointing at the same direction on the sheet, we need to define the direction separately.
For the main limb, it might not be clear what the right orientation should be (and in most cases it might not even matter) but for the rest: it’s the direction when they point directly outwards from the main limb.
IMPORTANT: Having incorrect sprite orientations may cause issues in flipping (turning around 180 degrees), in targeting (arms), and in the widgets used for adjusting the joint angles and animations. Therefore, it’s important to ensure that all the limbs have correct sprite orientations: outwards from the main limb.
Ragdoll
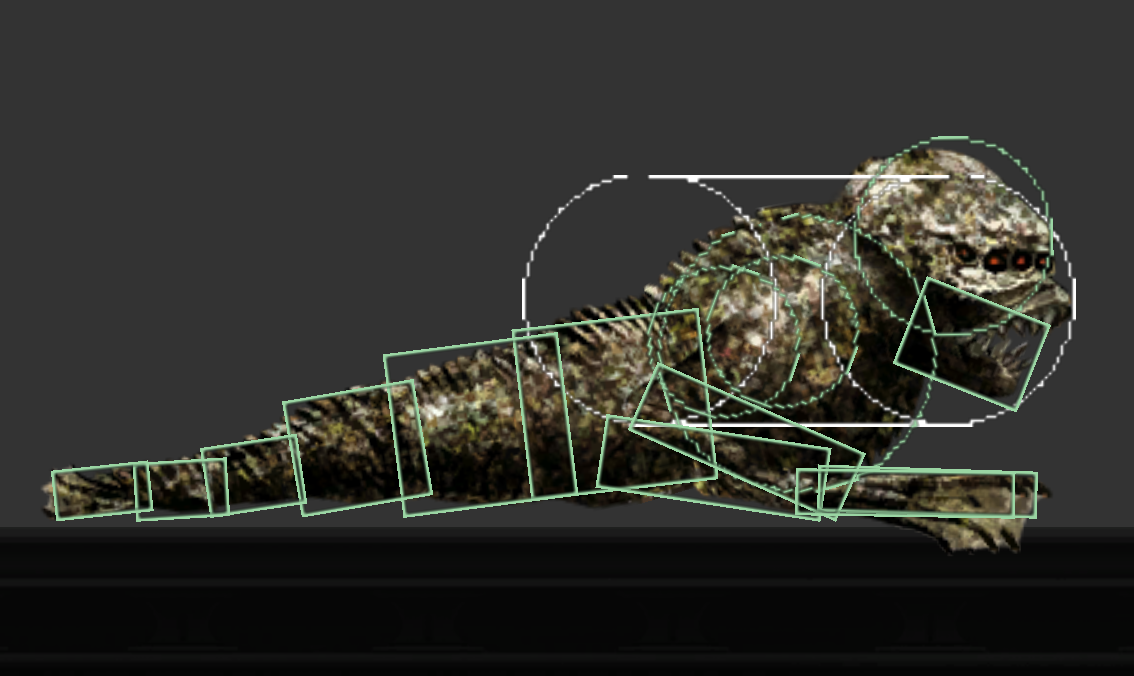
At this point, you should have a character with some limbs and joints. Limbs and joints together constitute the skeleton of a character, or a ragdoll, as we call it. Enable ‘Skeleton’ on the ‘Show’ panel to see the ragdoll drawn over the character.
A ragdoll has several settings that are not limb-specific. These settings can be edited by selecting ‘Ragdoll’ on the ‘Edit’ panel. On the right, you will now see the following settings:
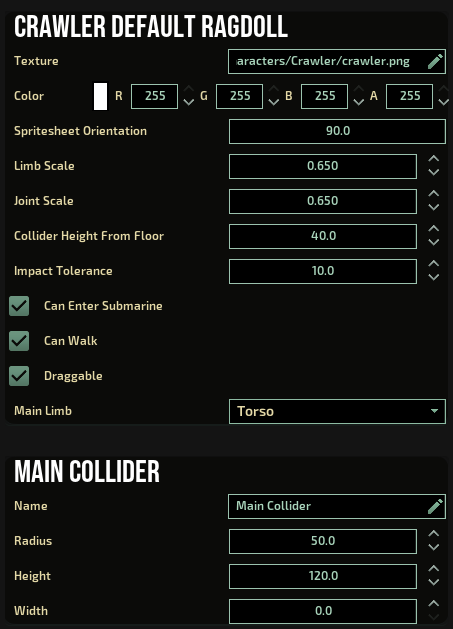
The main collider is an approximation of the character’s dimensions used for animations, multiplayer syncing and AI decisions. When you have the ‘Colliders’ mode enabled, the main collider is drawn in white (capsule/circle/rectangle) over the character. It’s important that the collider is of an approximately correct size and at the right position on the character. To adjust the position of the collider, you can change the ‘main limb’ parameter. By default, the main collider is placed where the torso or the head limb is at.
IMPORTANT: At this point you should check that at least the most important limbs of your character have the limb types properly defined. Select the ‘Limbs’ mode and enable ‘Parameters’ to see the limb parameters for each limb in the parameter editor. Make sure that the character has a torso and/or a head, that the legs and arms are defined as such, and that the tail limbs are given the type ‘Tail’. If the limb types are wrong, the animations will not work as intended, because the system doesn’t know which limb it should move to make the character swim or walk, for example.
For characters that can walk, it’s also important that the ‘Height From Floor’ parameter is given a reasonable value. Otherwise the character won’t stand where it should. This parameter doesn’t have any effect on swimming characters.
TIP: When you have limbs or joints selected, only the selected elements are shown in the parameter editor. If you want to see all the limbs or joints, deselect all by clicking the right mouse button.
Animations
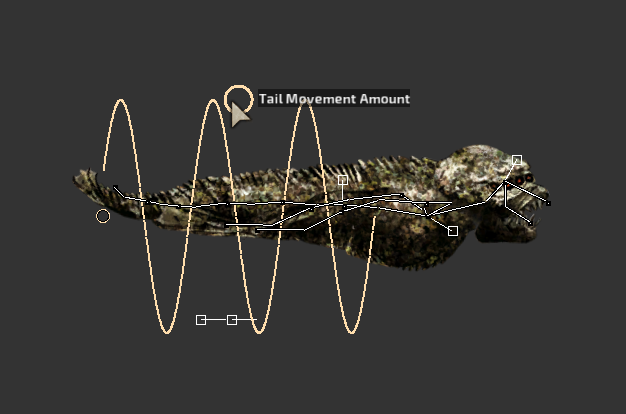
Animations are what make characters alive. Unlike in many other games, in Barotrauma the characters are entirely driven by physical forces. When we make the feet of the character take steps, or its tail swing when the character swims, we actually define forces on the limbs.
Doing this kind of physical animations is a bit different from ordinary keyframe based animations. We don’t have the same control on the movement. No exact poses for the character, nor animation clips. Instead, we have parameters and can provide some visualizations of them. The upside is that the animations can adjust to the environment without any kind of tweening or blending from an animation clip to another. So it can be more flexible and less work per character, because many things are almost automatic.
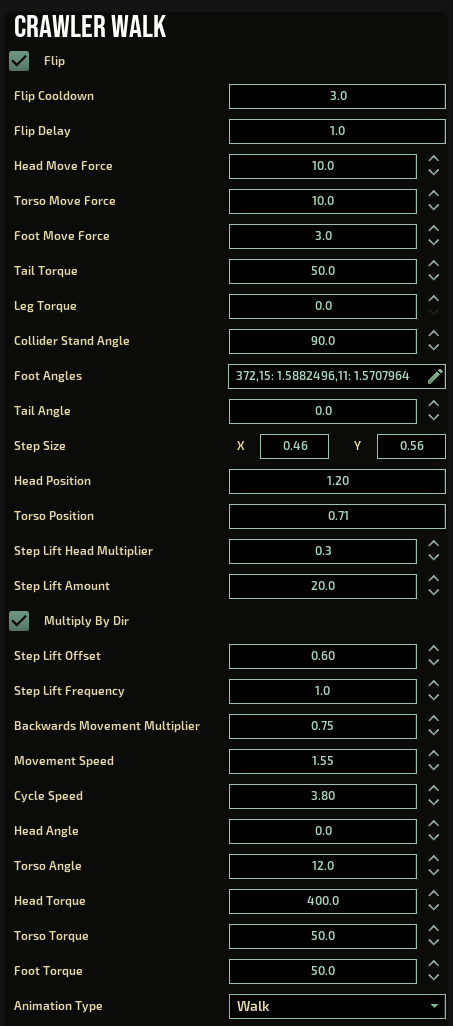
There are currently four main animation types for the characters that you can edit: ‘Walk’, ‘Run’, ‘SwimSlow’, and ‘SwimFast’ (Humanoids also have ‘Crouch’). Each of the animations is defined in a separate file and they have distinct parameters. Some of the parameters are common to all, some specific to the animation type. Most of these you don’t have to worry about, because you can easily experiment with the widgets that are drawn over the characters.
TIP: Press [e] to switch between walking and swimming animations. Press [Left shift] to switch between slow and fast movement animations. There’s also a drop down for selecting the animations.
However, there are some important parameters that you can edit only in the parameter editor. Select ‘Parameters’ on the ‘Show’ panel to open the parameter editor.
TIP: When the parameter editor is open, you can see which parameter(s) you are changing when dragging a widget over the character. The parameters that are updated should flash in green.
Character config parameters
A character’s config parameters define visual things like sounds and particle effects as well as functional things, like how the character acts, how much health it has, and whether or not it can walk. The parameters are stored in the character config file.
Enable ‘Character’ on the ‘Edit’ panel to see the character config parameters.
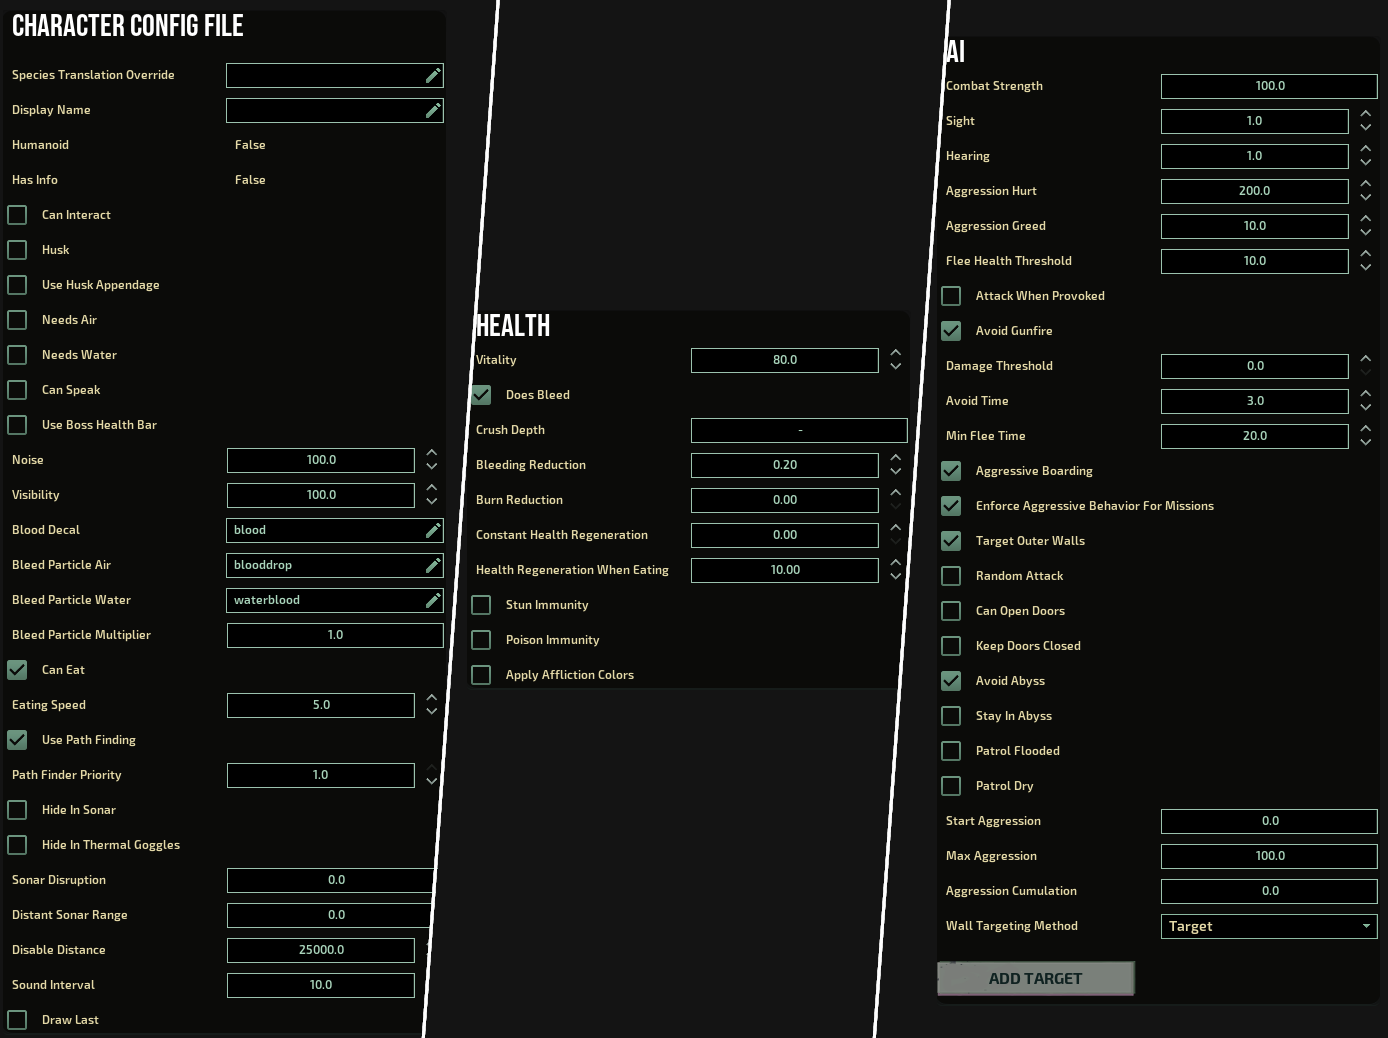
The AI section is an important one and might require a bit of explaining. Note that these settings only apply to characters using the ‘enemy AI’, which in the vanilla game means all the non-humans. The human AI is a separate beast altogether (It’s not very moddable, but can be somewhat adjusted with jobs, orders, and npc sets)
In the AI section, you can add targets with priorities and states. These are used by the AI to make decisions about which things the character should target, which state it should use while targeting, and what (base) priority should be given to this target. The actual priority is determined by dynamic factors like distance from the target.
You might also want to add some sounds and particles (like blood) to your character. If you want the character to drop some items, give it an inventory too.
TIP: The AI characters only target entities that have <aitarget/> tags in the XML definition. For some things, like the walls, this tag is added automatically in the code.
Damage modifiers
When you select a limb and enable the parameters (‘Show’ -> ‘Parameters’), you might notice that there are some things that are not yet explained in this guide. These are: attack, damage modifier, sound, and light. All these are optional settings for the selected limb(s). They are not visible, if no limb is selected.
I’m not going to go through all the options in detail, as there are tooltips in the editor and you should be able to figure them out by experimenting. However, there are some things that probably need a bit of explaining.
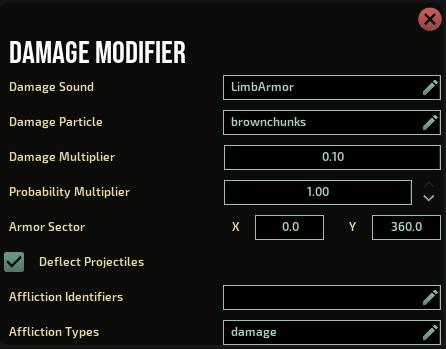
Let’s first take a look at the damage modifier. A damage modifier defines a multiplier for certain damage types. If the multiplier is above 1, the modifier increases the final damage on the character when it’s hit on the selected limb. If the multiplier is below 1, the damage is reduced.
If you enable ‘Damage Modifiers’ on the ‘Show’ panel, all the modifiers that decrease the damage are drawn on green over the character and the modifiers that increase the damage are drawn on red.
Damage modifiers are defined as sectors (in degrees) beginning from the top (0) and ending at the top (360) when looking at the sprite sheet. Note that sprite sheet orientation doesn’t have any effect on this. For example, if you’d want to define a damage sector that only affects the upper side of the sprite, you would define it as x: -90 and y: 90.
Attacks
Another thing that might require an explanation is the attack section. To add an attack, press the ‘Add Attack’ button, which is visible when you have a limb selected and when you have enabled ‘Parameters’ on the ‘Show’ panel.
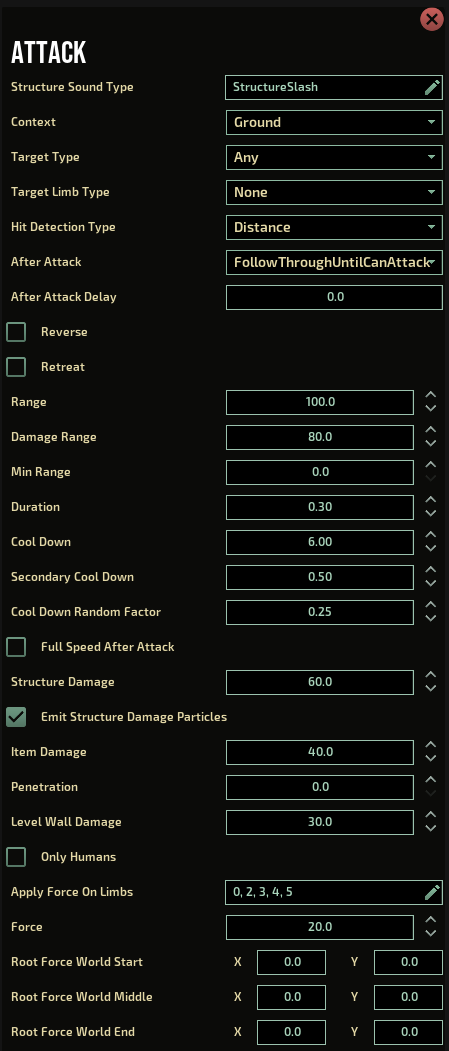
When a creature uses the attack, the forces defined in the attack parameters are applied on the attacking limb. This creates the attack ‘animation’. The forces can be applied only once or during the entire duration of the attack. When a legitimate hit is registered, the attack can also apply forces on the target that was hit. Note that these two things are completely separate from each other!
Attacks have a ‘Context’ and a ‘Target Type’ that can be used to restrict their use. By default, an attack can be used anywhere and against any target.
The hit detection type defines the method of how the hit is evaluated: a distance or a contact (collision). A distance-based attack hits the target if it’s closer than what is defined in the ‘Damage Range’ parameter. Note that the distance is calculated from the center of the limb, not from an edge. In some cases, the contact-based method might be better because it’s more precise. The downside is that it cannot hit targets that don’t actually hit the collider of the attack limb.
It’s important that the ‘Range’ is not too high or the ‘Damage Range’ too low, or the character won’t hit its target. Likewise, it’s important that the ‘Duration’ of the attack is not too low, or the attack might miss the target.
Note that currently each limb may only have one attack (for the sake of simplicity). If you need to define multiple attacks on head, for example, you can always create an extra limb and hide it. You might also want to disable the collisions for this hidden limb. This can be done by selecting the limb and crossing over the ‘Parameters’ option on the ‘Show’ panel.
File structure
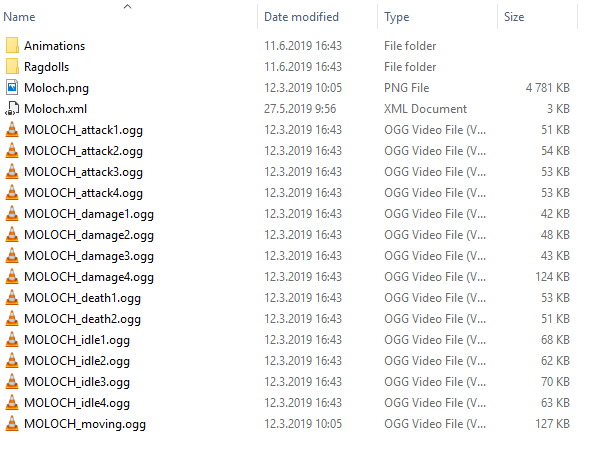
When you create a new character, you are asked to define a path for the character config file (e.g. %ModDir%/Characters/Mycharacter.xml). It’s strongly advised that the texture and sound files are placed in the same folder or in subfolders at the same location as the character config file.
When a new character is created in the editor, the system automatically adds the reference to the character config file in the content package and creates the animation and ragdoll files for you.
If you don’t want to use the default paths, you can change the paths in the character config, by changing the values for the ‘folder’ attributes of ‘ragdolls’ and ‘animations’ elements.
<Character SpeciesName="Stainedraptor" ...>
  <ragdolls folder="default" />
  <animations folder="default" />
  ...
TIP: You can have multiple ragdolls and animations for a single character. There can be only one ragdoll active at a time. However, different animations can be temporarily enabled with the trigger animation elements used in status effects.
TIP: Everything you edit in the editor has a representation in the .xml files. If you edit the animations, the animation files will change. And if you edit the ragdoll, the ragdoll file will change.
Limitations
There are some limitations to keep in mind when using the character editor. We work to reduce the amount of limitations, going forward. Also note that all the limitations can be overcome by manually editing the .xml files.
The current limitations in the character editor are the following:
- Unlike the animation parameters, many of the ragdoll parameters are not updated at runtime. Click ‘Recreate Ragdoll’ or press F5 to see the changes applied.
- Not all aspects of humanoids are exposed in the editor.
- Some AI behavior, like latching or swarming cannot be edited in the editor.
- There is no support for status effects in the character editor.
- Conditional sprites or damage overlays are not visible or editable in the editor.
- Sprite deformations are partially editable, but you cannot add or remove them in the editor.
- Decorative sprites are not editable in the editor.
Publishing your character
Publishing a custom character is the same as any other mod, see the Publishing page for instructions.
Thanks for reading!
We hope you found this guide helpful. It’s still a work in progress, so all feedback is most welcome! We look forward to seeing your awesome custom characters on Barotrauma’s Steam workshop. If you have any questions, please use the #baro-modding channel on our Discord or the Workshop Discussions subforum here on Steam.